Drywall construction plays a crucial role in modern building projects, offering a quick, efficient, and cost-effective solution for creating smooth walls and ceilings. Whether it’s for residential, commercial, or industrial buildings, drywall remains a staple material due to its flexibility, durability, and ease of use. This blog post explores the drywall construction process and why it’s an essential material for your next building project.
What is Drywall?
Drywall, also known as plasterboard or gypsum board, is a building material composed of a gypsum core sandwiched between two sheets of heavy paper. It’s used to create walls, ceilings, and partitions in both residential and commercial construction. Drywall is preferred for its affordability, quick installation, and various features like fire resistance and soundproofing qualities.
Advantages of Drywall Construction
Drywall construction has gained immense popularity over the years due to the many advantages it offers:
- Cost-Effective: Drywall is generally less expensive than traditional plaster, brick, or concrete walls. This makes it an attractive option for budget-conscious projects.
- Speedy Installation: Unlike plaster, which can take days to apply and dry, drywall can be installed in a fraction of the time. This speeds up the overall construction timeline.
- Fire and Moisture Resistance: Certain types of drywall are treated to be fire-resistant, making them ideal for areas that require extra protection, such as kitchens and garages. Moisture-resistant drywall is perfect for bathrooms and other humid spaces.
- Soundproofing Capabilities: Drywall is effective at reducing noise between rooms or floors, making it an ideal choice for areas where privacy and quiet are important.
- Sustainability: Drywall is often made with environmentally friendly materials and can be recycled, contributing to green building practices.
Drywall Construction Process
The process of drywall construction involves several key stages, each of which contributes to creating a high-quality, durable finish.
Step 1: Preparation and Measurement
The first step in drywall construction is accurate measurement. Measure the area where drywall will be installed, ensuring that all dimensions are correct. If you are installing drywall on both walls and ceilings, it’s essential to plan out where the drywall sheets will be placed, especially around doors, windows, and other obstacles.
Step 2: Cutting the Drywall
Once the drywall sheets are delivered to the site, you will need to cut them to fit the measured areas. Use a utility knife for straight cuts and a drywall saw for more complex cuts around fixtures like light switches or outlets. Score the drywall first with the utility knife and then snap it along the line to achieve a clean cut.
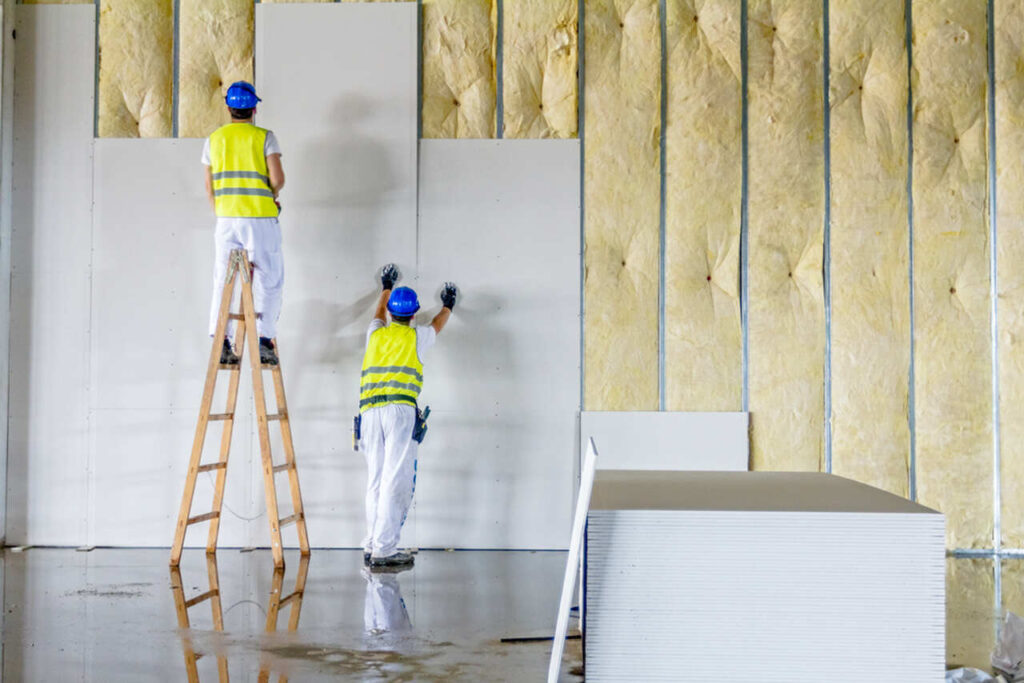
Step 3: Hanging the Drywall
Hanging the drywall is the next crucial step. Start with the ceiling, as this provides a solid foundation for the wall panels. Attach the drywall sheets to the ceiling studs using drywall screws or nails. When hanging drywall on the walls, start at the top and work your way down, ensuring the panels align with the studs and are firmly attached.
If you are working with large sheets, using a drywall lift or assistance from another person can make the installation process easier. Ensure that there is a small gap between the drywall and the floor to prevent moisture damage.
Step 4: Taping and Mudding the Seams
Once all the drywall sheets are installed, it’s time to apply joint compound (mud) to the seams between the panels. Start by applying a thin layer of mud over the seams and then press drywall tape into the wet mud. Smooth the tape out with a drywall knife, making sure it is fully covered.
Apply additional layers of mud over the seams, allowing each layer to dry before applying the next. After the final coat has dried, sand the seams to a smooth finish.
Step 5: Finishing Touches
After sanding the seams and joint compound, apply a primer to the drywall surface to prepare it for painting or other finishing treatments. Once the primer has dried, you can proceed with painting, adding texture, or installing wallpaper.
Tips for Successful Drywall Construction
To ensure your drywall project is a success, here are a few expert tips:
- Use the Right Type of Drywall: Depending on the area of installation, select the correct type of drywall. For example, moisture-resistant drywall is ideal for bathrooms, while fire-resistant drywall should be used in areas like garages or near heat sources.
- Proper Tools Make a Difference: Using the correct tools, such as a utility knife, drywall saw, and drywall lift, will make the installation process faster and more efficient.
- Don’t Rush the Mud Application: Apply multiple thin layers of joint compound rather than a single thick layer to avoid cracks. Be patient with the drying and sanding process to achieve a flawless finish.
- Ensure Adequate Ventilation: Drywall construction can produce a lot of dust, so ensure the area is well-ventilated to avoid inhaling dust particles. Wear a mask and safety goggles for protection.
- Consider Professional Help: If your drywall project is extensive, consider hiring a professional contractor to ensure the job is done correctly and efficiently.
Conclusion
Drywall construction is a fast, cost-effective, and flexible solution for building interior walls and ceilings. By following the right installation process and using the correct materials, drywall can provide a smooth, durable, and long-lasting finish for any project. Whether you are building a new home or renovating an office, drywall is a versatile material that offers excellent performance and aesthetic flexibility.
Call to Action
Ready to start your drywall construction project? Our team of experts is here to assist you every step of the way, from selecting the right materials to professional installation. Get in touch with us today to learn more and get a quote!